Friday, May 30, 2008

“Stitching Update #2” -- May 30, 2008

While working on projects I also like to start getting the next projects ready.

As I’m organizing my stash, I’m finding projects that I set aside for one reason or another. I am going to be adding these into the rotation as I complete some of my other projects.

Small Project: A Collection of Design’s “Firecracker Cookie”
I worked on this several years ago and I recently found it again in my stash. The problem I was having on this project is that I didn’t like the medium blue value that I was using. Both of the dark blue and medium blues are Kreinik’s metallics but the medium blue just wasn’t working. Frustration!

The first picture shows the medium metallic.


The second picture shows that I have ripped this out. I picked up several possibilities at my LNS a week or so ago which I’ll be experimenting with.


Stay tuned to see if I can find a solution and finish this project!

Thanks for reading my blog and commenting. I really appreciate you stopping by and I enjoy reading your comments! :-)

Cynthia
Windy Meadow

“Stitching Update #1” -- May 30, 2008

I did make a lot of progress this past week. Much of it was organizing the rotation system, and writing up a very detailed email about teaching children and teens how to do needlework. I did make progress on my different projects and the pictures are from Sunday night.

1. Large Project: “Holiday Patches” by Susan Krendt
I was able to finish stitching two sections of “Tiny Packages” including the outline stitching. Since these are two small areas, you’ll be able to see these two sections if you compare this picture to the previous picture from the May 11, 2008 post.


2. Medium Project: “Candy Swirl Santa” by Janet Zickler Casey
I have most of the first section of his hat covered in the red ribbon floss but its taking a long time to cover the padding as I need to lay the ribbon on both the front and the back of the canvas.


3. Small Project: “Peppermint Stripes” stocking by Joan Lohr April, 2008 Canvas of the Month Club
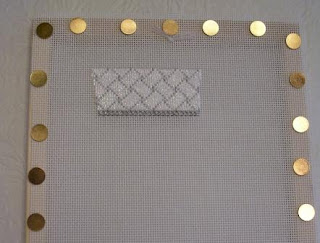
This past week, it was put on the stretcher bars and on the table while I’m waiting for the threads for the Santa project. I finished the cuff and the silver band right under the cuff. The picture doesn’t show it well as its white and silver on white.


4. Charity/Teaching Needlework
No progress this past week.

5. Organizing Needlework Stash
More items were moved into the “to be documented/sorted/stored pile”.

6. Household Stitching
Fixed my son’s stuffed crab. One side seam came open. :-)

7. Beaded Project: “Moonlight Ghost” (2008) MH188205
2008 Autumn Harvest Pins Collection
This was opened and organized on the table. About 20 stitches in white were stitched. I’ll share a picture when I have more progress as it doesn’t look like much right now. :-)


8. Gift Stitching
These projects were organized into their own tote so it will be easier to grab them when opportunity strikes!

Cynthia
Windy Meadow


Saturday, May 17, 2008

Heart Mouse -- May 17, 2008


A while back, okay a long time ago, I posted about my first project for the ANG 2003 Auction. This is the second project that I stitched for that auction.

This little guy was a lot of fun! There were hearts on the mouse and they were each done in bright primary colors. I selected Splendor Silk in bright primary colors for each of the hearts. I then selected a bright white in the Splendor Silk for the background and a green Splendor Silk for the green grid. Since the colors were so bright, I decided to stitch this canvas just using the basket weave stitch.

The canvas worked up quickly and since I was doing basketweave it was a very relaxing project. I would stitch up a bunch of the hearts and then the grid. While watching TV, I would then basketweave the background.

The mouse was in three parts, the back and each of the two ears. It was fun to compete each of the three sections and did not take that long.

I then sent it off to be finished. If I remembered correctly, I think that Sandy Jenkins did the finishing and she did a beautiful job! How do I know? Well I was able to bid on my own project even though I wasn’t there that day!

For the first time that I know of, the auction coordinators accepted sealed bids from those who did not attend the auction that day. We sent them an e-mail listing the highest bid that we would make. When the bidding was done, the highest bid won the item and for the Heart Mouse it was my bid! Yeah, he was able to come home to me!

I really appreciated that they would accept bids from the stitchers and I hoped that they would continue to offer this option. After putting all of that time and effort into a project it was wonderful that it was able to come home to me!

Unfortunately, they haven’t continued with this policy as every auction coordinator decides how they want to handle the projects and this must be quite a job. Keeping track of all of the canvases and who is stitching them and then coordinating the finishing. Then they need to write up a brief description to encourage everyone to bid on the completed piece and that doesn’t include setting up the display for the auction! Currently, they are not offering the stitcher the option to silently bid at the auction but I think you can offer to “buy” your project. Even though you purchased the fibers, developed the stitch guide, and donated your stitching time, they can’t “give” you the canvas as it was donated by someone else to raise money for ANG. Have I stitched additional pieces for the ANG auction? Yep, just check out the labels on the right and look for ang-auction, or pumpkin-boy. Will I stitch more in the future? It depends as I can’t attend seminar every year and I like to see what I’m going to stitch before volunteering. I’ll have to review the descriptions for next year to see if something catches my eye.

If you are an ANG member, check out the ANG Live and Silent auctions here at;
http://www.needlepoint.org/Auction/2008/index.php

and if you’d like to see the items that are available to stitch they are at;
http://www.needlepoint.org/Auction/2008/canvas.php

If you have any needlework related items that you would like to donate, then please contact the ANG Auction Chair at;
auction@needlepoint.org

The Heart Mouse now sits in one of my display cabinets and I still grin when I see him! He’s such a bright happy mouse!!!

I also wanted to thank everyone who is posting comments. It’s wonderful to know that you are reading my blog! Thank you!!!

Cynthia
Windy Meadow


Thursday, May 15, 2008

I’m a Sunflower -- May 15, 2008


Update: I had problems with my blog the other night which might have been caused by the heavy rain in the area. I've been able to upload the Sunflower picture today and the title and label. Now, on to more posts! :-)


There are different sites that have you answer a bunch of questions and then tell you what you are. This reminds me of those quizes that are in the different magazines! :-)

I asked my daughter if she thought this described me and after she was done laughing she agreed that I was a sunny type of person. I'm not sure if I was complimented or not... Sigh...

"When your friends think smile, they think of you. There is not a day that goes by that you can't find something good about the world and your fellow human."

I had fun with this one and I loved the picture so I thought I would share it with you. If you would like to try this yourself, the link is on the right, just click on the Sunflower. Have fun!

Cynthia
Windy Meadow

Monday, May 12, 2008

Cyn’s Rotation Explanation -- May 12, 2008

I thought I would share my stitching rotation system. I am most definitely a multi-project stitcher for many reasons. I switch between projects mainly because I enjoy stitching on many different projects. Since I work full-time and we are raising two very active teenagers my tiredness factor changes from night to night so it helps to have projects of different levels of complexity. I also find that if I’m working on several different projects, I’m less likely to get distracted by another project or to start feeling overwhelmed with the stash which is saying, “Work on Me”, “No, Work on Me”! :-)

I am fortunate that I can set up most of my projects at our very large oak dining room table. Since the table is so large, I can set up multiple projects at one time and then I just move from chair to chair or slide the project to the corner where I have my floor Ott light. Our house has a fairly open floor plan so by sitting in the dining room, I’m slightly separate from the activities going on in the family room and kitchen but I’m still close enough to be available. I’m also on the way to the rest of the house so everyone can easily stop by if they want to talk to me.

The goal is to work on each one of the 7 categories (gift stitching whenever possible) at least once before repeating that category. I don’t set a time limit or thread goal as my stitching time is not consistent. One night I might be able to stitch for two or more hours, the next night 15 minutes! I hope to accomplish at least the same amount of stitching time or progress in each category before repeating.

Right now my rotation includes the following;

1. Large Project: “Holiday Patches” by Susan Krendt

2. Medium Project: “Candy Swirl Santa” by Janet Zickler Casey

3. Small Project: “Stripes Stocking” by Joan Lohr
This is the April, 2008 Canvas of the Month Club

4. Charity/Teaching Needlework
I’m bouncing between getting materials ready to replenish the Cross Stitch and Needlepoint Magnets kits, developing the embroidery book marks for this August’s older girls camping weekend, and starting to work on “Kiss” pillows for the SanBernardino ANG Chapter.

5. Organizing Needlework Stash

6. Household Stitching

7. Beaded Project: “Moonlight Ghost” (2008) MH188205

8. Gift Stitching
This category is going to be worked on whenever the recipient isn’t home.

I’m going to try to post a weekly/biweekly update for the projects that I’m currently rotating through. Hopefully, this will help me update more often and you’ll be able to see the progress that I’m making. On the weeks where I’ve done less stitching, I’ll post pictures of projects that I’ve stitched over the years.

I’ll also be adding to my rotation the kimono’s designed by Margaret Bendig which are in this year’s issues of Needlepoint Now (
http://www.needlepointnow.com/). There are going to be four, one for each of the four seasons. The spring kimono has already been published and the summer kimono, “Summer Lavender Kimono” is in the current issue. These are apx. 5.5” x 5.5” and are just beautiful. My daughter has decided to stitch them as designed while I’ll be changing the colors. Should be lots of fun but we won’t be starting until July or August. She just has too much on her schedule right now.

I’ll also be adding in another project which I can share with everyone in June/July, 2008. Janet Perry of “Nuts About Needlepoint” (
http://www.nuts-about-needlepoint.com/) asked me to participate in a Bargello Challenge. More on this later.

Cynthia
Windy Meadow

Sunday, May 11, 2008

“Holiday Patches” by Susan Kerndt

My current large project is “Holiday Patches” by Susan Kerndt. This was a four day class project from the ANG’s Baltimore Seminar. The design area is a little less than 11” by 11”.

Susan taught us a felt and fabric technique that I had never done before. There are three squares on this design which are actually fabric. You stitch on a layer of felt for the padding and then stitch on a layer of fabric over the felt. You then embellish the fabric with stitches and beads. What fun!

The first picture is what I was able to accomplish while at seminar during the class and in the evenings. When you take a needlepoint class, especially with a large design, you won’t be able to stitch the whole piece in class. The instructor has you stitch the various areas as she explains and demonstrates the stitches and techniques. As you can see, the stitching is all over the design with lots of away knots everywhere! :-)


I continued working on this design when I returned home and had a wonderful time with the stitching. I concentrated first on stitching the areas that I had started in class and the borders. I must admit that right after the Holidays I needed a break from Holiday things and we had a lot going on so I put this project away for about 4 months while I worked on several smaller projects. In our family the kids watch the winter vides during the summer and the summer videos during the winter. They’ve been doing this since they were very small. :-)

I just placed this design back on the table and started stitching again this past week. The picture below is what I accomplished before putting the project away.


Susan was an excellent instructor and the design booklet for this class is wonderful! Its spiral bound so it lay’s very nicely on the table. I was able to pick up this project and start stitching right away.

I’ll keep you posted on this and my other projects.

Cynthia
Windy Meadow

Wednesday, May 7, 2008

“Angel Tree Topper” -- May 7, 2008

I just heard from Ginger of “Edie and Ginger Designs” that this was one of their earlier pieces. I thought this might be one of theirs but I couldn’t remember! Ginger, thanks for letting me know it was one of your designs.

Cynthia
Windy Meadow

“Candy Swirl Santa” -- May 7, 2008


The “Shining Needle Society” offered Janet Zickler Casey’s “Candy Swirl Santa” this past fall as a class. I love Janet’s designs so I quickly signed up. Once I finished the “North Star Santa” I added “Candy Swirl Santa” into my rotation.

I quickly stitched up the face but then ran into a challenge for the eyebrows. This is a line drawn canvas and on my particular canvas I only had four rows of pink face above the eyes to place the eyebrows on instead of five. The directions called for the eyebrows to be several rows of stacked stem stitch but this wasn’t working on this small area. I spent some time fiddling with this before I finally decided on over stitching the stem stitch twice to get a nice padded look with out him looking like he had a forehead full of hair! :-)

This past weekend, I stitched down the cotton padding for the first layer of the hat. I have started stitching the red ribbon which is going to go on over the padding. This has been lots of fun so far and I look forward to stitching on my Santa!

You can see Janet’s designs at;
http://www.jzcdesigns.com/

The “Candy Swirl Santa” is at;
http://www.jzcdesigns.com/candy%20swirl%20santa.htm

The “Shining Needle Society” will be offering more of Janet’s Santas this summer. You can read about the “Shining Needle Society” at;
http://groups.yahoo.com/group/SNS_Home_Room/

Cynthia
Windy Meadow

“Santa” – Canvas of the Month Club – July, 2004 -- May 6, 2008

Santa” is the July canvas from the Stitching Post’s 2004 Canvas of the Month Club.

Have you ever had a project that is more of a challenge than most? Well this one is mine for this year! I’m not sure when I lost control of this project! :-)

This was kitted by my LNS in 2004. The instructions and the materials were fine. I was able to stitch the border even though it took a while. You stitch a layer of a matte thread for the border. You then stitch over this border with Neon Rays in white skipping stitches which will then be filled in with the red and green Neon Rays. No problem, just a lot of counting. Stitching both whites took a while but adding on the red and green Neon Rays went very quickly. The first picture shows the white matte and Neon Rays stitched with some of the green. The second picture shows all of the red and green Neon Rays. So far so good.


You then stitch Santa in the center. Well the pink of his face took a while but no problem. I then needed to outline stitch and then fill in his hat. Still no problem.

I started this project the weekend ending in March 17, 2008 while visiting a college with my daughter. It’s now well into April and I feel like I’ve been stitching on this piece forever and it’s small! We’ve been very busy with activities and I haven’t had as much stitching time which also added to the feeling that this project was taking forever. Maybe that was the problem. I just wanted to get this one done. :-)

I then started stitching his hat brim but I picked up the wrong thread, Alabaster which is a chainette thread. Now I’m not very found of chainette threads but I do know how to stitch with them and I will use them when a design calls for one. As I was stitching I kept looking at it thinking this doesn’t look right even stopping to ask my daughter what she thought of the Alabaster. Sigh… I should have trusted my stitching instincts and stopped right then and there. Instead I kept on stitching not realizing I should have been using the Fancy Fur for the hat brim and the Alabaster for the beard and mustache. Of course by the time I realized this, it was too late. You can’t rip out a chainette thread and reuse it. Argh!

So off I went this past Saturday to visit my LNS to order more Alabaster. The third picture is of the whole design completed except for his beard and mustache and the hat pompom which will be stitched in Fancy Fur.


Poor Santa has now been placed at the end of the table and he’ll be completed once I receive the Alabaster.

Cynthia
Windy Meadow


Tuesday, May 6, 2008

Blog has Moved! -- May 6, 2008

Welcome to my new blog!

I’m glad that you could join me. I’ve copied all of my old entries from my Yahoo blog to my new blog with the comments that everyone has made.

I’ve spent the last several weeks rebuilding my blog but I have been stitching. So I have lots of new pictures that I will be sharing with everyone.

Please comment and let me know that you’ve found my new blog!

Cynthia
Windy Meadow

Monday, May 5, 2008

Finishing the Finished Projects -- April 20, 2008

Both Pat and Jane have asked me what am I going to do with these smaller canvases that I’ve finished stitching?

Ummm… right now I’m not sure. :-)

I’ll probably finish them as ornaments as I can use them in so many different ways. I know I have lots of other projects in my stash that I’ve finished stitching but that I haven’t finished into ornaments or whatever. I actually found a bag of stitched pieces recently.

I’m going to wait until I’ve finished organizing my stash and then decide what I want to do. Since I know I have lots of pieces that I’ve finished stitching, I also know that I won’t be able to send them all off at once, too expensive! So not only will I be prioritizing my stitching projects, I’ll be prioritizing the projects that I want finished!

In the meanwhile, my daughter is still stitching though we’ve both been slowed down with all of the Spring activities keeping us busy. I’m not complaining but I would love to have one evening without something going on… Since she is finishing more projects than I am, I am sending hers off to be finished into whatever. Mom’s can projects can wait! :-)

Cynthia
Windy Meadow

Originally Posted: April 20, 2008

“Tiny Treasures” – Canvas of the Month Club, March, 2008


“Tiny Treasures” is the March canvas from the Stitching Post’s 2008 Canvas of the Month Club.

I started stitching this design while spending a weekend visiting a not so local college with our daughter. We had lots of fun sitting around Sunday night in the hotel room working on our projects! I quickly finished it up when we returned home.

“Tiny Treasures” was designed by Cathy Lyon and Marian Morton for Rainbow Gallery.

I enjoyed stitching this canvas and I hope you enjoy the picture!

Cynthia
Windy Meadow

Originally Posted: April 13, 2008

“O’Tannenbaum”– Canvas of the Month Club, August, 2004 -- April 10, 2008


One of my goals is to keep up each month with the 2008 Canvas of the Month club canvases. So far I’m meeting my goal.

Another one of my goals this year is to not only keep up with the Stitching Post’s 2008 Canvas of the Month club but to also stitch at least one canvas each month from the 2004 Canvas of the Month club. So far I’ve found several in my stash from the 2004 club. Once I’m done with these I’m going to have to find the others!

I finished stitching “O’ Tannebaum” in March, 2008. “O’ Tannenbaum” is the August canvas from the Stitching Post’s 2004 Canvas of the Month Club.

“O’ Tannenbaum” was designed by Beth Robertson and Suzanne Howren of Shear Creations for Rainbow Gallery.

I enjoyed stitching this quick canvas and I hope you enjoy the picture!

Cynthia
Windy Meadow

Original Comments:

- This is cute, Cyn, how are you going to finish it?
NC Pat – Needleart Nut

- I love the border! Yes, how will you finish it? Are they all going to be little ornaments for a new Xmas tree?
Jane of Chilly Hollow

Originally Posted: April 10, 2008

North Star Santa – Finished!!! -- April 7, 2008


I promised that I would share a picture of my stitched “North Star Santa” once he returned from the finisher.

Here he is!

I think he turned out beautifully and will be a wonderful addition to our Holiday decorations!!!

Enjoy!

Cynthia
Windy Meadow

Original Comments:

- Cyn--great job! He did turn out beautiful, and you need to send him to me so I can take a closer look! LOL
NC Pat -- Needleart Nut

- He's wonderful! I especially like the red braid all around him. That makes the white hair and beard really stand out. Lovely job, Cynthia.No, Pat, she needs to send him to Chilly Hollow first. I'm old with poor vision and have to see this in person....Jane, trying hard to get her grubby mitts on this delight
Jane of Chilly Hollow

- Thanks guys and keep your grubby paws to yourselves as he's staying here!!! :-)

By the way, "North Star Santa" will be offered by Janet Zickler Casey through the Shining Needle Society this summer.


So Pat you will be able to stitch him and add this fun canvas to your collection of "Santa Pops"!


Jane instead of wanting mine, how about you stitch your own "North Star Santa"? He's line drawn, and yes you do need to count but not that much. Come on over to the Counted Canvas side... To quote my daughter, we have cookies!!!


Or in my case dark chocolate! :-)

Cynthia

Windy Meadow

Originally Posted: April 7, 2008

Angel Tree Topper -- March 31, 2008

Update: I just heard from Ginger of "Edie and Ginger Designs" that this was one of their early pieces. I thought this might be one of theirs but I couldn't remember! Ginger, thanks for letting me know it was one of your designs!

During the recent Holiday’s I took the opportunity to take pictures of my Holiday needlepoint projects. I’ll be sharing the pictures over the next several months as there is a lot more than I thought there was!

I stitched this Angel Tree topper many years ago. Possibly in the early 90’s but I’m not sure exactly when or who was the designer. I’m trying to keep better records for my new stitching!

There is a variety of fibers on the Angel. I know I used DMC #5, Kreinik and ribbon. Both the front and the back of the Angel are stitched.

She is fully lined and finished in a cone shape. If I ever decide I don’t want to put her on top of the tree, I can always display her by inserting a cone or paper and standing her up on a flat surface.

Every year she is the first thing on our tree and usually the last thing to be taken down. The kids have grown up seeing her smiling down at them so I don’t think she’ll be replaced anytime soon!

Hope you enjoy seeing our Angel Tree Topper!

Cynthia
Windy Meadow

Original Comments:

- Cynthia, this is wonderful! You should be very proud of this piece! Thanks for sharing!
NC Pat – Needleart Nut

- She's charming and a part of your traditional Christmas. Long may she decorate your trees!
Jane of Chilly Hollow

Originally Posted: March 31, 2008

Anasazi Song -- March 27, 2008


The Shining Needle Society has a class for Carole Lake’s “Anasazi Song”. You can see this project and read the description on Carole’s site but don’t forget to come back here when you are done! I'll wait...

http://www.carolelake.com/

You can go directly to “Anasazi Song” at;

http://www.carolelake.com/TeachingPieces/Anasazi.htm

I took this class several years ago when the ANG Black-Eyed Susan’s guild hosted Carole to teach this project. Carole’s directions are very detailed and easy to follow. She is a very entertaining instructor and I thoroughly enjoyed this class.

I must admit that when I came home from the second day of class, life was very busy as usual and I put “Anasazi Song” in my stitching to do pile. I had pulled it out this fall but I didn’t want to add it yet to my 2008 project list until I saw how I was doing on my other projects. Once I heard that I could audit the class through the Shining Needle Society I decided to add this project to my 2008 project list. I’ve posted a picture of my partially finished “Anasazi song” above. The class has started but I probably want start back up on my piece until summer. Now that Spring is here, the school and children activities have started back up again and we are busy most nights and weekends!

Don’t forget that you can join the Shining Needle Society’s Home Room Yahoo Group and it’s free!

http://groups.yahoo.com/group/SNS_Home_Room/

Just email
KateGaunt@aol.com to join the SNS Home Room where they post the new class offerings.

Cynthia
Windy Meadow

Original Comments:

- Nice! It will be fun to watch your progress on this piece
NC Pat – Needleart Nut

- Hi Cyn! We met at this class--I finished mine and it was a lot of fun and just the right size--not too big and not too small.

Colleen

- Pat, don't hold your breath on this one as I probably won't be able to start again until school lets out! :-)


Colleen, great to hear from you and yes I do remember meeting you through email and then in class! Did you finish yours that year? Send me a picture and I'll post it on my blog. And by the way, do you remember what year we took the class? I'm still trying to look up my checks to see when I took this class...

Cynthia

Windy Meadow

Originally Posted: March 27, 2008

Threads and Holiday Trees -- March 27, 2008

Jane asked if I was enjoying using the threads in the canvas of the month club kits.

Yes I do, but I must admit, I am familiar with all of the threads so far as I’m familiar with most thread lines. I’m fortunate that my LNS carries many different thread lines and the rest I can mail order.

I’ve been stitching for many (and I do mean many) years and I have quite a thread collection! Psst… don’t look at the several large plastic storage containers behind that curtain in the corner filled with threads!

I must admit I’m not a big fair of chainette threads as I do find myself using “interesting” language when they start to unravel and yes I know all of the tricks to stitch with them. And sometimes they still unravel!

I will even stitch with rayon threads when I want to achieve a certain look though I usually try to make sure I’m rested and there isn’t a lot of commotion/excitement going on. Now this is not easy to accomplish as we have two wonderful teenagers and their friends in the house. So finding a time when I’m rested and it’s also quiet is just about next to impossible!

I can now hum the theme music to World of Warcraft (yes I have a character, she’s now Level 16 and a Night Elf), and most Nintendo video games!

Jane also asked about my Raven’s tree with Edgar, Alan, and Poe. Well, they are now packed up till next Holiday season so I’ll try to remember to take a picture this year. Edgar, Alan, and Poe are the Raven’s Football team mascots. Ours are stuffed figures about six inches tall. We also have a fun Raven’s snowman which is about 14 inches tall who sits on the base of the table. You can read about the Raven’s mascots, on the Raven’s website at;

http://www.baltimoreravens.com/Ravenstown/Mascots.aspx

The garland on the tree is purple and gold footballs. We also have small Raven player nutcrackers, and small purple and small gold balls. This past year I found purple, white and black candy canes with the Raven’s logo. We also have many buttons from when the Raven’s went through the playoffs and won the Super Bowl.

Now I must admit that we are not big sports fans in this house (please don’t tell our co-workers) but I’ve had lots of fun finding these odds and ends over the years to decorate our tree.

Cynthia
Windy Meadow

Original Comments:

- Threads everywhere? Sounds like my kind of stash! Thanks for the information about the Ravens tree. I love the sound of that. It's great because of all the local connections you celebrate with a tree like that. As for Warcrack, sorry to hear you can hum the music now. Over in Chilly Hollow where the Internet connection is horrible, we only know the theme song for Elder Scrolls IV Oblivion….
Jane of Chilly Hollow

Originally Posted: March 27, 2008

Canvas of the Month – February, 2008 -- March 13, 2008


Pictured above is the second in this year’s Canvas of the Month Club by Rainbow Gallery. The design is “Christmas Fantasy” by David McCaskill.

This one took a little longer that the last two that I stitched. I would estimate that it took me about three hours to stitch the whole design.

The design is symmetrical on all sides even though the picture is showing the design wider than tall. There are several layers of interwoven threads for the center section. The outer red area is stitched in red Neon Rays so it takes a while to lay the ribbon just so!

The fibers in the design are Nordic Gold, Neon Rays, Petite Very Velvet, and Petite Treasure Ribbon. The gold just glistens in person and the purple makes the design look very rich!

My daughter and I are stitching these from our LNS, The Stitching Post in Catonsville, Maryland. I’m ahead of her by two now but she’s been very busy with school. She’ll catch up and pass me with her stitching projects this summer!

Enjoy the picture!

Cynthia
Windy Meadow

Original Comments:

- This is stunning! Nice stitching Cyn!
NC Pat – Needleart Nut

- I like mixing red and purple and this is very pretty. Are you enjoying trying all the threads?
Jane of Chilly Hollow

Originally Posted: March 13, 2008

Holiday Trees -- March 12, 2008

On my last entry I started responding to Jane and Pat’s comments about decorating Christmas trees with needlepoint when I realized I was writing enough for another blog entry not for a comment!

I think this is the time to admit that I don’t believe it’s a true Christmas tree until there are enough decorations so that there is no green showing. Or that’s what my family says!

We set up several trees every year and about every other year we add another tree to the mix. No, our house does not look like one of those wonderfully decorated homes that you see on HGTV but maybe someday!

Tomato Cage Tree
The tomato cage tree is made from two tomato cages wired together to form a cone shape. The cone is then wrapped in lighted garland. The tree is then decorated with silver and red ornaments. We display this tree in the family room in a corner near the fireplace.

Fiber Optic Tree
We’ve had this tree since the kids were small. It’s decorated with small gold musical ornaments and with white honesty spray painted gold. This tree is displayed in a corner of the family room near the kitchen table.

Kitchen Tree
The kitchen tree sits on the kitchen counter. It’s decorated with a blue and white theme with small cookie cutters and snowman ornaments. Underneath the tree are several small blue and white lunch boxes and several primitive standup snowmen.

Ravens Tree
This tree is displayed in the hallway leading to the bedrooms but is visible from the dining room (our house is a Rambler/Rancher with a finished basement. I love one story living!!!). The tree is decorated with purple lights that we purchased at Halloween and with purple and gold balls. It’s also decorated with Raven’s ornaments and nutcrackers. Underneath the tree is a Raven’s snowman and Edgar, Alan, and Poe.

All American Tree
The All American tree is displayed in our family room in the basement. We just started decorating this tree this year so we are still building up our collection of All American ornaments. I need to stitch more!

Dear Daughter’s Tree
Our daughter’s tree is displayed in her room and is covered in gold and white ornaments with white lights. Very elegant!

Dear Son’s Tree
Our dear son’s tree is displayed in his room and matches his red, blue, green bedroom colors and is very colorful and young man friendly.

Christmas Tree
The largest tree is in our music room and sits in the bow window. It’s covered in hand made ornaments and with a few purchased ornaments that have been given to us over the years. The tree topper is an Angel that I needle pointed many years ago.

I’ve been stitching for a very, very long time so there are cross stitched and needle pointed ornaments everywhere! I love pulling my old friends out every year and decorating the house. I enjoy adding to my collection of stitched and finished projects every year so that the new additions over time become old friends!

Well I hoped you enjoyed hearing about our Holiday trees. And yes it does take a while to set everything up! Next year I’ll have to take pictures of our decorated trees! And I’ll leave the story about the Halloween tree for a future blog entry!

Enjoy!!!

Cynthia
Windy Meadow

Original Comments:

- I am in awe! That is a tremendous number of trees as well as a great deal of work. You will have to post photos! I can't wait to see them next year!
NC Pat – Needleart Nut

- I can't wait to see photos, either, particularly of Edgar, Allan and Poe and their tree.
Jane of Chilly Hollow

- WOW!!!! That is all I can say....just WOW!!! Pictures are a must for next year.
Kelly W.

- Me, either. I am especially interested in hearing more about Edgar, Allan, and Poe's tree. What fun you must have with these!
Jane of Chilly Hollow

Originally Posted: March 11, 2008

You Make My Day Award -- March 5, 2008


I just found out that Pat “The Needle Art Nut” gave me the “You Make My Day Award”.

Thank you so much Pat!

Pat does a wonderful job of keeping up with her blog and you can see what she is stitching at;

http://360.yahoo.com/needleartnut

I really appreciate the award and I’m happy that you and others are reading my blog!!!

I was inspired to start my blog after seeing several others blogging, especially in the knitting world. This is also a great way to keep up with what the kids are doing now as I didn’t quite see myself creating a Face Book page!

Cynthia
Windy Meadow

Original Comments:

- You are welcome, and we all blog as we can! No requirements to do it every day!
NC Pat – Needleart Nut

- Thank goodness! :-)

CynthiaWindy Meadow

Originally Posted: March 5, 2008

Canvas of the Month – October, 2004 -- March 5, 2008


In 2004, the Stitching Post in Catonsville, Maryland offered a canvas of the month club. I purchased many of these canvases in 2004 but they were lost in my stash. I’ve found several of them as I’ve been reorganizing my stash. By the way, my goal is to go through at least one storage (40 – 60 gallon) container every month and so far I’m meeting that goal!

The first in the 2004 club that I have stitched is the October, 2004 canvas “Hearts for the Holidays” which was designed by Joan Lohr for Rainbow Gallery. I finished this design this weekend so technically it was finished in March, 2008. Not bad for a four year old UFO! I just noticed that the January, 2008 canvas is also by Joan Lohr!

I am also working on the February, 2008 Canvas of the Month club project which is “Christmas Fantasy” by David McCaskill which I hope to finish this weekend. It just depends on how busy I am this weekend, especially since I’ll be working on Sunday.

I’m also almost done with the Candy Swirl Santa’s face. He just needs his eyebrows so I should hopefully have his face done this weekend and I’ll be able to share a new picture next week.

Yes, I know, I work on multiple projects at one time. This works very well for me as I like to have at least two to three active projects at any one time especially if I’m picking out fibers and stitches for a painted canvas project. I can work on something else while I’m letting my creative brain decide how to stitch a certain section. The other advantage is that since I’m still working full-time and raising children there are some nights where I am more tired than others and I can pick the project that works for me at that moment!

This design is stitched on Victorian Green 18 count mono canvas. The design consists of two Rhodes hearts stitched in Petite Frosty Rays. The other two Rhodes hearts are stitched in Petite Sparkle Rays. The Double Straight Crosses are stitched in Crystal Braid.

This was a fun design to stitch but it does take a while to stitch each of the Rhodes hearts as you need to make sure that the fibers are carefully laid flat. The Double Straight Crosses worked up very quickly.

I keep thinking that I need to keep a stitching log so that I can document how long it takes me to stitch each piece. This has been a stitching resolution for several years but it doesn’t work for me as I’m usually stitching at the dining room table and the family stops by and talks to me as I’m stitching. I’m not complaining but it does make it hard to keep track of the time that I spend stitching!

This project was a lot of fun and it was interesting to see how the two fibers worked up in the Rhodes hearts. There is a lot of dimension with the hearts which I don’t think shows up as well in the photo as it does in person. I’ll probably finish this design as an ornament. As I’m organizing my stash I’m finding many of the pieces that I’ve stitched over the years that I have finished stitching but which I haven’t finished into something. The fun for me is in the stitching and I haven’t taken the time to decide how to finish many of the pieces that I’ve stitched. This is one of my new resolutions. To actually frame or have my finished stitched pieces made into something. I’ll let you know how I do!

Cynthia
Windy Meadow

Original Comments:

- Good luck getting things finished. I saw two 4 foot artifical Christmas trees displaying ornaments at Woodlawn yesterday and they were charming! You should think about using your small pieces this way. This one is sort of Valentine's Day but it is red and that is a very Christmas color!Way to go, Cynthia.
Jane of Chilly Hollow

-I like this and it would be a great Ornament, box cover, pincushion on a stand, part of a collage of small ornaments.....does that help? LOL Nice job! And, I wish I could say I sorted through a container a month! I always run out of time!
NC Pat – Needleart Nut

- Thanks for all of the finishing suggestions. I actually know what I can finish my different projects into... My comment was that I wasn't exactly sure what I would finish this particular project into! I actually enjoy the stitching process more than the finishing process. That's why I send most of my projects out to be finished. I rather be stitching! :-)

Thanks guys for all of the suggestions.

And yes, the organizing is continuing!

More on the trees in the next post.

Cynthia

Windy Meadow

Originally Posted: March 5, 2008

Canvas of the Month – January, 2008 -- February 20, 2008


Update:

I forgot to mention that the flecks that you see on the canvas are metallic gold accents. The whole thing just sparkles!

The kits contain the fibers that are listed on the instructions so every kit contains the same colors. It would be fun to do the designs in different colors and on different colored canvases!

I also wanted to mention that this series is by Rainbow Gallery and you can find Rainbow Gallery at;

http://www.rainbowgallery.com/

The free designs that they offer for needlepoint are here;

http://www.rainbowgallery.com/freechartdownloads.cfm?ID=12

They also offer free designs for Cross Stitch, Plastic Canvas, Blackwork and Hardanger.

Have Fun!!!

Cynthia
Windy Meadow


I don’t have a new picture yet of the “Candy Swirl Santa” as I’m still working on his face and he’s not ready to come out and greet everyone until he has his full mustache! He’s still a little lopsided.

While I’m working on him, I thought I would share with you a quick project that I did this month. Several of the fiber companies share free patterns using their fibers on their websites. In addition, many have a project of the month design series that they offer exclusively to needlework shops. These projects are usually small and work up quickly so this is a great way to try out new fibers or techniques. If you have problems counting, and you know who I’m talking to, this is a great way to learn to count on a small project before moving up to larger projects.

This year, my local LNS, the Stitching Post in Catonsville, Maryland, is offering a monthly Canvas Ornament Club. The designs are from the Rainbow Gallery. For a small fee you can join the club. Then each month during the series, you stop by and pick up your canvas with all of the threads that you will need for this particular design. The cost of the kits may vary but so far they are less than $10.00.

My daughter and I both signed up as I thought this would be a good way for her to expand her horizons in counted canvas work.

The first canvas for January, 2008 was designed by Joan Lohr and is “Medallions”. This was a quick project and fun to stitch. I didn’t time myself but I would estimate that it took me less than two hours to stitch this project. Happy Dance time!

Enjoy and I should have February’s up soon!

Cynthia
Windy Meadow

Original Comments:

- We can wait for Candy Swirl to have his face on, no problem!
And why did everyone in the room turn and look at me when you mentioned counted thread pieces? Your shop is doing something very nice with these little sample kits. Is it fun for you and your daughter to use different colors and threads on the same chart?
Jane of Chilly Hollow

- Nice, and it will be a quick to finish! I wasn't either pointing at Jane!
NC Pat – Needleart Nut

- You were too, Pat. I saw you. Thanks for the update, Cynthia. I thought the speckles were just an artifact of the photo. That happens sometimes. Gold metallic flecks in the canvas should make this spectacular! I like the metallic canvases. They add so nuch to little ornaments!I'm sure the store would have trouble making up kits of various color combos (so much work!) but that would be fun. I just love it when local guild chapters do geometric programs and everyone picks different colors. I'm not good with color and I always learn a ton from that exercise.Anyway, glad you are having fun with this and thanks for the links.
Jane of Chilly Hollow

- Cyn, I named your blog in my Made my day Award listing! Thanks for doing so!
NC Pat – Needleart Nut

- I just found out that Pat “The Needle Art Nut” gave me the “You Make My Day Award”. Thank you so much Pat!

Cynthia

Windy Meadow

Originally Posted: February 20, 2008

Tiger Ornament -- February 15, 2008


One of my needlepoint friends is Jane of Chilly Hollow. Jane has a wonderful needlepoint blog which you can see here;

http://360.yahoo.com/chillyhollow

Update: Due to Yahoo’s 360 difficulties, Jane created a mirror blog which is at;
http://chillyhollownp.blogspot.com/

Now that you are back from Jane’s blog, you did come back didn’t you? I thought I would share with you another project that my daughter stitched and finished this past year.

Several of us who had met through our blogs and emails decided to meet at the 2007 ANG Seminar in Baltimore, Maryland. When Jane heard that my daughter was a beginner stitcher, she offered to bring a new project to seminar for my daughter as Jane believes strongly in encouraging stitchers. My daughter was impressed that someone who didn’t know her would be willing to give her a needlepoint canvas.

Why is it kids are always more impressed when someone encourages them in their hobby or interests even when their parents are cheering on from the sidelines??? I probably was the same but I don’t think I want to ask my mother that question…

My daughter thought long and hard on the choices that Jane gave her and finally decided on the Lee White Tiger.

I brought the canvas home from seminar and we were off to our local LNS. She picked out Rainbow Gallery’s Petite Very Velvet for the shades of black and gray on the tiger. She then picked out a Splendor silk in blue, white, and black for the eye. She added one stitch of #32 (Pearl) Kreinik #12 metallic in the eye for interest. The nose was stitched using a pink Splendor silk. She added another texture by choosing a cream and darker tan Impressions thread for the lighter areas of the tiger. The Impressions is slightly fuzzy so it gives a furry look to the tiger.

She finished this project in several days while watching TV. So off I went to our local LNS to drop him off for finishing. She was busy that weekend and couldn’t come along so I picked out the threads for the braid/cord. I selected cream and gray DMC #5 threads and added a Kreinik #32 braid for some sparkle.

Well it didn’t take long for her tiger to return from the finisher and he turned out beautifully.

We both want to thank Jane for her generosity!

Cynthia
Windy Meadow

Original Comments:

- Very nice job! Cute ornament
NC Pat – Needleart Nut

- I'm blushing at the compliments! If you knew how many people have helped and enouraged me in my NP, you wouldn't be surprised I was paying them back by helping your daughter, Cynthia. The white tiger is spectacular!Please tell your daughter it is lovelier than I could have done. I hope she had a lot of fun with it. She picked some lovely threads and you did your part, Cynthia--you bought her great threads to use. So this is a 3-way collaboration, four ways if you count Theresa Lee the designer, who did a wonderful canvas.Jane/CH

- Hi,I'll tell her that you both like her ornament!As a volunteer I know that you don't always know if helping someone is appreciated. We both appreciated your support of her new hobby!Cynthia

Windy Meadow

Originally Posted: February 15, 2008

North Star Santa – Done!!! -- February 14, 2008


My goal was originally to finish my "North Star Santa" by the end of January, 2008 as he is one of the projects listed on my 2008 Stitching Goals. Unfortunately, I ran out of time due to illness (nothing major) and having to work two Sunday's during January, 2008.

My new goal was to finish "North Star Santa" by Sunday night, February 3, 2008. Well I made it!

I've posted a picture of my completed "North Star Santa" at the top so you can see how great he looks. He’s already been taken off of the stretcher bars and sent off to the finisher.

I'll post a new picture when he comes back from the finishers.

Enjoy!
Cynthia
Windy Meadow

Original Comments:

- Yeah! Happy Dance! Clap,clap,clap! Nice job! I can't wait to see him as the ornament! Aren't these fun to do?
NC Pat – Needleart Nut

- Very cute, Cynthia. Bet it is wonderful when it is finished.
Jane of Chilly Hollow

- I'll definitely post a picture when he comes back from the finisher.Janet's Santa's are a lot of fun to do!I'm working on the "Candy Swirl" Santa now and I hope to have a picture for posting soon. I'm almost done the face and mustache.Thanks guys! :-)

Cynthia
Windy Meadow

Originally Posted: February 14, 2008

Pat’s Heart and my Daughter’s Interpretation -- February 4, 2008


I thought I would also share with you several pieces that my daughter has stitched since last summer. Now I have bought several canvases for her over the last two years. She would pick them up, stitch a little bit, and then put them down again. Well as I explained in my entry on, August 7, 2007 she quietly picked up a Lee circle this past summer and quickly finished the design without my knowing that she was stitching! Since then she has stitched several pieces but I wanted to share with you her second completed piece. First a little background information.

I joined the Needlepoint_etc Yahoo group as soon as it was formed. For several years there was a Secret Pal exchange. We would gather up fun needlework related items over a year and then send them to our Secret Pal at the end of the year. I’ve enjoyed the Secret Pal exchange for the years that it was organized, even though one of the boxes that I sent was misplaced on a Post Office shelf! Talk about being worried as many of the items could not be replaced!!! I've made some wonderful online friends through this Yahoo group.

During the last Secret Pal exchange, Pat Warner-Sorci had my name and she sent me a wonderful box of goodies. One of the items was a lovely needlepoint heart that she had stitched for me and framed. Pat stitched the heart but left the background unstitched. She then added a layer of shiny gold fabric behind the canvas when she framed the heart. It's beautiful and I have it in my dining room stitching area.

Pat explained in her note that this is a design that she created to show others how to stitch. It’s stitched with Watercolors so no two hearts are the same. I loved the design and asked her for the pattern as I thought it would be something my daughter might like to stitch. Of course, I already knew that I would like to stitch one for myself!

Not only did Pat send me the pattern, she also sent a kit for my daughter to stitch the ornament! Wasn’t that wonderful?

My daughter and I had put the canvas on the stretchers bars and I explained to her how to follow the pattern. I wasn’t home when she decided to start on the heart. When she picked up the canvas to start stitching, she didn’t pick up the Watercolors fiber that Pat had sent with the kit. Instead she picked up another skein of Watercolors that I had on the table (which was an absolute mess at the time) and stitched Pat’s heart. As you can see above, it’s full of cream, soft blues, and greens. Don’t worry, she’s saving Pat’s Watercolors for her next heart.

She had so much fun stitching the heart she didn’t stop stitching! She actually finished the heart in 2 ½ hours without taking a break! She had a lot of fun but she decided that she wouldn't do that again.

I was very surprised when I came home from work that night to see the finished heart!

My daughter decided that she wanted to have the heart finished as an ornament. The finisher added the ribbon bow and it turned out beautifully!

This is the second needlepoint piece that she started and actually finished so I thought I would share it with everyone.

She is very proud of her heart and it was displayed proudly on our Christmas tree this year!

We would both like to thank Pat for her enthusiasm and her generosity in not only sharing the pattern but providing a kit!

Thank you Pat!

Cynthia
Windy Meadow

Original Comments:

- Cyn, your daughter did a wonderful job! I love the colors! Are you sure she is just a beginner?
NC Pat – Needleart Nut

- Beautiful! I am thrilled to see what she has done, Cynthia. She's a natural stitcher, isn't she?Jane, waving from Chilly Hollow

- Hi,
Yes she was a beginner when she stitched this project. Now I'd call her an intermediate and well on to her way to being an advanced stitcher. Just wait to you see several of her other projects!I just love working with older teens as they are quick to learn and willing to try new things!
Cynthia
Windy Meadow

Originally Posted: February 4, 2008

North Star Santa - Almost Done -- February 3, 2008


I started the "North Star Santa" in Janet Zickler Casey's class during the 2001 ANG Seminar in Washington, DC. I enjoyed the class and wanted to continue working on my Santa but when I arrived home I was sick with sinus and ear infections. I had planned on picking the Santa back up to finish the stitching when I felt better, but several days later was September 11, 2001. With everything that was happening I put this project away and it became buried in my stash. Every once in a while I would think about my "North Star Santa" as I knew I wanted to finish him to add him to my needlepoint ornaments.

I also wanted to stitch more of Janet's designs, but the only way that you can purchase one of Janet's designs is by taking that canvas class with Janet or at ANG Seminar's Expo where sometimes Janet offered canvases from discontinued classes. You couldn't purchase any of her canvases directly from her or from an LNS. One of my stitching friends had attended several more ANG Seminars since 2001 and had picked up several more of Janet's Santa's at ANG's Expo. Yes, we are both Janet Zickler Casey canvas collectors!

This past fall, Kate Gaunt and Marie-Therese Baker started the Shining Needle Society which you can read about here;

http://groups.yahoo.com/group/SNS_Home_Room/

They announced that their next project would be two of Janet's Santa’s, "Candy Swirl Santa" and "North Wind Santa". Wahoo! Since I didn't have either of these canvases and I was interested in what they would be offering in future classes, I joined the Shining Needle Society. There is a fee for each class but membership to the Shining Needle Society's Home Room Yahoo group is free!

I then learned that Janet had created a site where you could see all of her projects at;

http://www.jzcdesigns.com/

To see Janet’s Santa’s, click on the “Christmas” link or go directly to;

http://www.jzcdesigns.com/christmas.htm

Not only do I have several more of her Santa's but I also have "Tom Turkey"! Of course, now that I can see all of her projects I want all of her Santa's, and of course I need "Miles" and "Prudence" to go with "Tom Turkey" and “Miss Liberty” to go with my “Uncle Sam” and...

I ordered both of the Santa’s that would be offered through the Shining Needle Society classroom. I then decided that I needed to finish the "North Star Santa" as he was the first one in my collection before I could start on the new Santa's. I dug around in my stash, and believe me this took a while as it had been packed up and moved around several times as we finished our basement!

I still had quite a bit to finish on my "North Star Santa". When you are taking a needlepoint class you usually can't finish the project in class. The teacher moves around the canvas teaching the stitches or techniques for different sections/areas of the project and answering questions. Now this is very hard for someone like me who, for want of a better word, tends to be a little bit AR. Okay, a lot! :-) I've found I do better in classes if I concentrate on one area at a time, and write down the notes from the instructor for the other areas and sometimes I may stitch a sample of the stitch for that area. In other words, I had finished stitching "North Star Santa's" face. I had laid down stitches for his hat, mustache and beard so I would remember how to stitch these areas when I arrived home. I've found this especially helpful when I have to put a project down for a while. Okay, okay, in this case several years!

This was a fun project and worked up fairly quickly. I've posted a picture I took a week ago showing the areas that were completed. My goal was to finish him by the end of this weekend, February 3, 2008. I'll post another message in a day or so to let you know if I made it!

Cynthia
Windy Meadow

Original Comments:

- Very cute Santa, Cynthia. Good luck getting him done quickly so you can start on the others.
Jane of Chilly Hollow

- This is a cute one! Can't wait to see how you do!
NC Pat – Needleart Nut

- Hi Jane and Pat,Thanks for the enouraging words. Stay tuned and I'll let you know if I finished the North Star Santa on schedule!

Cynthia
Windy Meadow

Originally Posted: February 3, 2008

Sunday, May 4, 2008

2007 Completed Projects -- January 12, 2008

Well, I’ve posted my goals for 2008 so I thought I would also post the projects that I completed in 2007.

The Detailed List

2007 Completed Projects

1. Black Eyed Susan’s ANG project for the ANG Silent Auction
Status: Completed!!! Happy Dance!!!

2. Barbara Fox’s “Peace Star”
Status: Completed!!! Happy Dance!!!
I finished this in April of 2007.

3. ANG Baltimore Seminar Name Tag
Status: Completed!!! Happy Dance!!!
I posted detailed information on my August 4, 2007 and July 7, 2007 entries. It came back from the finisher in time for seminar and I loved wearing it at seminar.

4. Heartstrings July Flag, HS5607
Status: Completed!!! Happy Dance!!!
I started this in 2006. You can see Pat’s design on the Artists Collection website at;
http://www.artistscollection.net/Artists_Collection/HeartStrings_Gallery.html

The July flag is actually on this page;
http://www.artistscollection.net/Artists_Collection/Calendar_Bitties.html#6

More pictures soon!

Cynthia
Windy Meadow

Original Comments:

- You go, girl! Can't wait to see more photos!
NC Pat – Needleart Nut

- Congratulations, Cynthia. You did well in 2007!
Jane of Chilly Hollow

- Thanks for the comments!I think I did well in 2007. Especially since I re-designed one of the projects which I think takes longer than deciding how to stitch a painted canvas! :-) I also have several projects which I have not completed but which I did a lot of stitching on in 2007. So I'm hoping to get quite a few done in 2008. We'll see how I do at the mid-year report! :-)More pictures soon!!!

Cynthia
Windy Meadow

Originally Posted: January 12, 2008

ANG Silent Auction – Pumpkin Boy -- January 6, 2008


This past fall at the Baltimore ANG Seminar I volunteered to stitch a donated item for a future ANG Seminar auction. I've already posted pictures of items that I've stitched for previous auctions. I don't stitch a canvas every year to donate as I've found I don't like stitching under a deadline. Especially with my busy unpredictable life! :-)

This year I picked out A Collection of Designs "Pumpkin Boy" during the ANG Life Patron Luncheon. I've checked on the A Collection of Designs website and this doesn't appear to be a current design as it's not shown.

I always put a canvas down on the table and look at it over several weeks to see how it wants to be stitched. I also make up a story or think about what the canvas is showing before I select fibers and stitches. This helps me to bring the canvas alive. I also like stitching the face first as once the person, etc. has a character it helps to decide how the canvas should be stitched. Unfortunately, with this canvas I didn't have a lot of time to decide how he would be stitched. I selected the canvas at the end of August, 2007 and I need to return it to the ANG Auction Coordinator by March 1, 2008. Now this may sound like a long time to have to stitch a piece but since I'm still working full-time and raising children it's not a long time for me! :-)

I quickly decided that I really wanted to accent the ridges of the pumpkin. After trying several fibers I finally decided to use DMC #5 for the pumpkin costume. Why? I wanted the sections of the pumpkin to be the focal point not the fiber. I also wanted it to reflect a little light but not a huge amount as our young man is out trick or treating. So imagine that he's walking across a yard and there is just enough light so you can see him in his costume. Okay, can you see him as he's just about to walk up and ring your doorbell? That's the visual image I'm going for!

I decided to stitch the body of the pumpkin using a diagonal mosaic going up to the right on the right side of the pumpkin and then going left on the left side. This also will add to the visual interest as the fiber will reflect the light differently on each side. The separation between the pumpkin ridges is in a darker pumpkin color and is also DMC #5.

The stockings were done in green in Petite Very Velvet in basket weave. I just love this fiber as it really does give a velvet look. This works well for the green legs as our young trick or treater is either wearing tights or dark green pants.

The shoes were done in black Neon Rays in simple basket weave. I didn't want to over emphasis the shoes and this combination worked well but does reflect the light differently than if I had done the shoes in DMC #5. I also wanted to break up the light between the stockings, the feet, and the ground.

Now this design was not painted with a ground. I understand that our designers don't always paint a floor/surface for people or animals, etc. as this gives us (the stitchers) a lot of flexibility in deciding in what scene to place the person, etc. I am more comfortable with placing objects on a surface and you as the stitcher can have lots of fun deciding where to place the design. In this case, our young man is walking across the ground to the next house. The ground was stitched in DMC #5 in basket weave. If I didn't give him a ground to walk on, he would appear to be walking in space if I used the same stitch and color to stitch all of the background around him!

I use the basket weave stitch a lot in a design as it gives the eyes a resting point between the focal points of a design. In this case the focal points are the pumpkin costume, the trick or treat bag, the hair, and the night sky. I did not want to emphasis the ground, his legs and shoes, face (which is very simply painted as it's hard to see features at night), and the pumpkin hat and stem.

My next decision was what to use to stitch the trick or treat bag. I finally selected Neon Rays as it would give it a little light reflection but since the pumpkin costume was stitched in diagonal mosaic, I didn’t want the trick or treat bag to fight with the stitch on the pumpkin costume. I also decided to add two beads where the gold dots had been painted. The trick or treat bag also had a gold moon painted. I decided to add a Mill Hill Glass Treasure Golden Moon on the trick or treat bag. In the picture above, the moon is not stitched on as it will be added by the finisher when they finish the canvas.

The arms and face were stitched in Splendor silks using a basket weave stitch. I didn’t want to emphasis the face and arms as it’s hard to see pale colors at night and I had already decided that I didn’t want these elements to be a focal point of the stitched design.

I also decided to stitch the pumpkin hat and stem in basket weave using DMC #5 as I didn’t want to make these focal points. In addition, I couldn’t continue using the mosaic stitch on the hat as I did on the body of the pumpkin for several reasons. My rule of thumb is that a stitch needs to repeat at least three times either horizontally or vertically for me to use the stitch. If not, you just can’t see the stitch and it reads to my eyes as “noise”. After quickly counting, I knew that I would not be able to repeat the diagonal mosaic stitch three times. Also, how would I angle the middle section? The right section would lean right, the left section would lean left, and what would I do with the center section, lean center? J So in this case stitching the hat and in basket weave made sense.

Then I spent a lot of time deciding what to do for the background. Now the canvas background was not painted and was still white. What ever I selected would have to cover the white canvas so that bits of canvas (dandruff) would not peek through as I was not planning on painting the background! I’ve done this for other canvases but I wasn’t going to paint the background as it would take time, and would be tedious with all those little areas to paint.

I played around with a lot of different fibers and finally decided on a purple silk and ivory in a vertical Bargello or Florentine stitch. Now this stitch has probably already been named and written up in several books but it’s what I dreamed up again one night. I would to give movement to the sky and the stitch would need to move in a vertical direction so as not to fight or overemphasis one side of the pumpkin costume. I also wanted to add some glitz so as I stitched each row of the background, I then went back and added a singled strand of Kreinik Blending Filament in a purple color. The first row I added the blending filament on the point of the stitch and then on the second row I added the blending filament on the valley of the stitch. I then continued alternating this sequence as I stitched the whole background. I’m really pleased with how this turned out as it does add movement, implies that it’s dark outside and does not compete with the pumpkin costume. In addition it fills in the background and covers the white canvas very well and reads as a dark thick night with sparkle from either stars or the street lights. Mysterious but not threatening. Plus the purple really makes the orange pop!

The final element that I added was our young mans hair. I used one strand of a dark brown Splendor silk with two strands of a medium brown Splendor silk in the needle. I then stitched long stitches in the way that his hair would fall, especially if it was being slightly blown by the wind. Now why did I make his hair so long if this was a boy, well I don’t know about your area but here the young men have been wearing their hair longer and so that it covers their forehead and most if not all of their eyes! One year at a family reunion I was laughing as we have more young men (Middle and High School) than we have young ladies and I felt like I was at a Cousin It reunion! You couldn’t see anyone’s face and they don’t brush their hair back but peek through it! What a hoot!

I hope you’ve enjoyed my interpretation of Pumpkin Boy as he will be traveling to the ANG Auction Coordinator soon. If you see him at an ANG Seminar Live or Silent auction please bid lots of money. He deserves it and would be a fun addition to anyone’s collection!

Cynthia
Windy Meadow

Original Comments:

- Wow!
This was great to read and the project is terrific! I have two to stitch and will be starting them shortly
NC Pat – Needleart Nut

- Hi Pat,
Glad you like it!He was a lot of fun to stitch!!!Now we need to hear about your projects.
Cynthia
Windy Meadow

- Cynthia,
The stitching is great! I loved your commentary. I felt like I was walking with our young friend on Halloween. Only thing missing was the chocolate! Also loved the Cousin It reunion comment. What a hoot.
Kelly W.

- Hi Kelly,
I'm glad you liked the "Pumpkin Boy" and the commentary.Of course there was chocolate! That's what he's going to eat when he gets home! The reward for walking all night! :-)Yes, we did have a "Cousin It" reunion! And of course I couldn't laugh as it would have hurt feelings so I just grinned a lot!
Cynthia
Windy Meadow

- Very funny posting, Cynthia, and very informative, too. It was interesting to read about how you worked out the problems of this canvas to your satisfaction. Thanks for sharing!
Jane of Chilly Hollow

Originally Posted: January 6, 2008

2008 Stitching Goals -- January 3, 2008

Many stitchers post their stitching goals for the year on their blogs. I think many use it as a way to keep motivated so that they actually finish several projects during the year!

I’m going to try a 2008 Stitching Goals list and we’ll see how I do!!!

My first goal is to do a better job on updating my blog! I know, I know, I haven’t been doing a good job and you would think that as much as I can talk I wouldn’t have a problem writing things for my blog… It’s not a writing or idea problem, it’s getting the pictures off of the camera onto the computer and then onto the blog problem! I don’t have a problem with the camera or the computer, I just don’t seem to find the time to hook everything up and get the job done!

I’m going to start small for my stitching goals as I want to give myself a chance on succeeding…

The Detailed List

Projects I’m currently working on:

1. Holiday Patches” by Susan Kerndt
Status: 10 of 24 squares completed.
This is a wonderful piece that I started as a class at the ANG Baltimore Seminar in August, 2007. You can still the piece on ANG’s website at;
http://www.needlepoint.org/Seminar-07/classes/4day/42711.php

I’ve finished 10 of the 24 squares and I’m really enjoying stitching this piece. Since Susan is still teaching this piece I won’t be pasting pictures on my blog, just letting you know of my progress. My goal is to do a square every two weeks. That sounds like a long time to stitch each square but they are very detailed and with my busy schedule, I’m hoping I can stitch one square every two weeks!

2. “North Star Santa” by Janet Zickler Casey
Status: ½ done
I started this piece at the ANG Washington, DC seminar in 2001. Yep, 2001! I enjoyed stitching this piece during the one day class but unfortunately I returned home sick and I put the piece away. I’m determined to finish it now and I’ve done a lot work in the last two weeks. Janet’s website is;
http://www.jzcdesigns.com/


The “North Star Santa” is at;
http://www.jzcdesigns.com/north%20star%20santa.htm

I’ve finished the face, the mustache, and the beard. I’m currently working on his hair.

3. “Cobblefield Road” Cyber Workshop
Status: In progress.
The top of the Clam Shell border, Band 1, and the Starfle border is done. I’m working on Band 2. Since this is a class I can’t post pictures on my blog but you can see a picture of “Cobblefield Road” on the Yahoo Group main page;
http://groups.yahoo.com/group/cobblefieldroad/

4. “Heartstrings Chimney Santa”
Status: In Progress. Apx. ¼ done.
I purchased this piece about a year ago as I love Pat Thode’s designs. She designs under the “Heartstrings” name and you can see them on the “Artists Collection” website. The “Artists Collection” website is at;
http://www.artistscollection.net/Artists_Collection/Welcome.html


The “Chimney Santa” is on the 13th row of the Santa collection or at;
http://www.artistscollection.net/Artists_Collection/Santas.html#36

5. My Son’s Strictly Christmas Stocking
Status: On the stretcher bars, doodle canvas on the stretcher bars, and threads purchased.
This is on 13 count and I’m going to need to practice with the doodle canvas and the threads as I’m more used to working on 18 count.

6. My daughter’s Ornament
I’m also working on an ornament for my daughter but I can’t post any information here until I’ve finished the design and I’ve given it to her as she reads my blog.

7. Barbara Fox’s “Noel Star”
Status: On the stretcher bars and started.
I’m doing the background in basketweave so this is my “I’m too tired to think or traveling piece”.

8. “Candy Swirl Santa” by Janet Zickler Casey
Status: Directions received and materials purchased.
This project was available through the Shining Needle Society and you can read about the society at;
http://groups.yahoo.com/group/SNS_Home_Room/


They offered two of Janet’s Santa’s this past fall and they will be offering additional online classes by various designers in 2008. You can see Janet’s “Candy Swirl Santa” at;
http://www.jzcdesigns.com/candy%20swirl%20santa.htm

9. Organize the Needlework Stash
The craft room is finished, the boxes to sort into are ready and everything has been moved to the basement. Now I just need to find some time on a weekend so I can start playing, I mean organizing my stash!

Well that’s it for my list. Yes, I know it’s only nine projects, but I said I wanted to start small!

Cynthia
Windy Meadow

Original Comments:

- Nine projects sounds HUGE to me! I normally finish around 6 in a year, although lately I've been finishing more since I try and stitch every day. I'm impressed, Cynthia!
Jane of Chilly Hollow


- Yippee! More pictures and commentary! I love it and we will be checking on you and making sure you blog! I love your list. I am doing two of Janet's Santas too!
NC Pat – Needleart Nut

- Wow! That is one heck of a list! Can't wait to see pictures and more blogging.
Kelly W.

- Hi Guys,

Actually I have a head start as even though most are large projects, I've already started six of them. :-)I usually finish anywhere from 5 - 10 a year depending on the size of the project, family commitments, family illness, etc. We'll have to see how I do this year.I'll keep the pictures and commentary coming. That's my first resolution which isn't listed! :-)

Cynthia
Windy Meadow

Originally Posted: January 3, 2008