I’ve been enjoying reading everyone’s comments on my recent posts so I thought it would be time for another episode of “Comments, Questions, and Answers”!
Rotation Stitching
Oh my, I didn’t expect all of the responses and you all are soooo funny!
My purpose in writing the article was to give an over view of rotation stitching and to give some guidelines so that anyone who is interested can develop their own rotation stitching. There have been many posts on different discussion lists and on blogs about specific rotation systems. These are all well and good, but they might not work for everyone as I found they don’t work for me! :-) I need a more flexible system especially since I usually can’t stitch for a set time period. I grab stitching time when I can!
I’m glad that you found my article to be informative (and non-threatening) and it’s been a hoot to read how rotation stitching won’t work for any of you who commented! LOL!!!
I’ve also enjoyed reading about how you organize or don’t organize your stitching and it sounds like all of you are having a lot of fun which is what this is all about! Isn’t it? :-)
I’ve admitted that it took me a while to decide to use a stitching rotation and I must admit that I don’t always follow it. That’s why I finally added a “Random Project” category so when I want to just grab something else I can say that I’m actually following my rotation! :-)
I have found that it has helped with all of those distractions of wanting to stitch other projects. Those “Oh Shiny” moments! :-)
I also know that I don’t get as overwhelmed with everything in my stash as I know I’m making progress and I’ll get there eventually!
Yes, Kathryn I would call your “Yearly Goals” a modified rotation system as you will be working through different projects throughout the year as you work on different projects in different locations even if you aren’t actually rotating through a set of projects.
Pierrette, your system is working for you as you stitch and complete a tremendous amount of projects every year.
Pat, yes I know, I’m working on that hat! More pictures soon!
Carolyn, only three projects? I’m glad that works for you but I have to admit that I need more or I start getting antsy. LOL
Vonna, but look at what you stitch every year! Your system is working for you and that’s all that matters!
Coni, all I can say is I was laughing out loud when I read your comment, especially “Lather, rinse, repeat”!!! Maybe Stewey needs to set up your rotation for you! ROFLOL!!!
Holiday Patches
Jeanne asked how the fabric patches were attached.
The first step is to take your piece of fabric and iron on fusible webbing to the back.
The second step is to cut a piece of felt, in this case green, slightly smaller than the area that will be covered by fabric. This is stitched to the canvas.
The third step is to cut the fabric slightly bigger than the felt but slightly smaller than the border. In other words, the unfinished edges of the fabric will fall right in the center of the border stitching. The fabric is then stitched to the canvas.
The fourth step is to stitch the border all around the fabric which covers the unfinished edge of the fabric.
The fifth step is to enhance the fabric with decorative thread, stitches, beads, etc.
This was a lot of fun even though it seemed like it took forever to get to the stitching!
We have so many wonderful techniques with needlework now than we did thirty years ago.
If you are interested in exploring different needlework techniques I would recommend “New Twists on Needlework Embellishment” by Suzanne Howren and Beth Robertson. Wonderful book!
Bargello Stocking
Yes, this was lots of fun and it’s very interesting that even though Janet and I used the same line we came up with totally different designs!
Ruth, Bruin Colors? LOL! No, I hate to say that I just picked those colors because I liked them. My High School colors were green and gold, very pretty. My college colors were dark purple and dark gold, not so pretty. Since I’m in Ravens and Orioles country, I should be using purple and black or black and orange! :-)
Pat asked if I was going to finish this myself? ROFLOL!!!
I can do just about anything with a needle in my hand but using a sewing machine… Nope, not going to happen as I find the whole experience very frustrating and my language becomes quite questionable! :-)
The Bargello stocking will be sent to my not so local needlework shop for professional finishing!
This is frustrating for me as my grandmother was an outstanding seamstress. I was the only grandchild who showed any interest in sewing but since she was left handed and I’m right handed I was able to learn certain skills but not others such as sewing with a machine. I have found that I’m very comfortable helping anyone who is left handed learn to stitch as I can translate the stitching techniques and stitches for them quite easily.
My DD is actually right handed but left eye dominant so she writes with her right hand but will do other things with her left hand.
For anyone who is thinking about doing a bargello piece please go ahead. Once you stitch the base line, it’s very soothing and fun! If you do a bargello piece, please let us know as I’d love to see what you come up with!!!
Stitching Goals
Yes, I know they are a lot but it’s what keeps me motivated. LOL!
Stitching Update
I thought I would post my progress on my 2008 goals since it was past the half way mark for the year. I can’t believe that it’s almost August! Where has the year gone?!
I enjoyed writing that post and it helped to see what I had accomplished so far this year. It’s very easy to get mentally bogged down on what is left to do as opposed to what has been accomplished. Especially when you haven’t finished a project in a while.
I hope to finish one of my projects by this weekend and I’ll be posting updated pictures.
My DD is also now done with her high adventure camping event (12 days backpacking in New Mexico) and has made a lot of progress on several of her WIP’s. I’ll be posting those pictures soon.
Comments
I do appreciate your comments and it’s a lot of fun to know that I have needlework friends visiting my blog! Especially since I know that you are taking time out of your busy schedules to stop by. Thank you!
Windy Meadow is about to get very windy as a thunderstorm is just about here so I’ll say by for now. Enjoy the rest of your week!
Cynthia
Windy Meadow
Wednesday, July 30, 2008
Monday, July 21, 2008
“Stitching Update” -- July 21, 2008
I’ve finally had a chance to take some pictures so I can share some progress on my stitching projects. Enjoy!
2. Medium Project: “Candy Swirl Santa” by Janet Zickler Casey
Status: I’ve made some progress on the hat. The first swirl is done and I have the second swirl about ½ done.

3. Small Project:
“Peppermint Stripes” stocking by Joan Lohr April, 2008 Canvas of the Month Club
Status: I’m still working on the body of the stocking. The silver and red vertical stripes work up very quickly. The green stripe is the Fern stitch which takes a little longer as I have to carefully lay all of the threads. It’s worth the time and effort as it’s very pretty when it’s done.

2. Medium Project: “Candy Swirl Santa” by Janet Zickler Casey
Status: I’ve made some progress on the hat. The first swirl is done and I have the second swirl about ½ done.
3. Small Project:
“Peppermint Stripes” stocking by Joan Lohr April, 2008 Canvas of the Month Club
Status: I’m still working on the body of the stocking. The silver and red vertical stripes work up very quickly. The green stripe is the Fern stitch which takes a little longer as I have to carefully lay all of the threads. It’s worth the time and effort as it’s very pretty when it’s done.

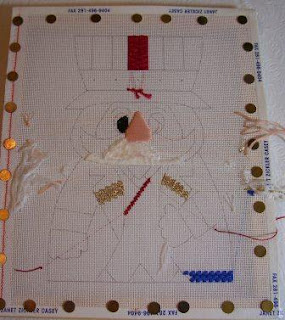
“Santa” by Cheryl Schaeffer
I started working on this project last Spring but I had to stop as I mixed up two of the threads and had to order both threads. The Alabaster has come in so I was able to finish the mustache and beard. I’m still waiting on the Fancy Fur to finish the pompom on the top of his hat. Since the border is raised, while I’m waiting on the Fancy Fur, I’m stitching about three rows on basket weave so that finisher has a smoother flatter edge for finishing.
Status: Finished mustache and beard.
Started stitching basket weave edge.

8. Gift Stitching
Status: In the last two + weeks I was able to work on DD’s and DH’s ornaments. Pictures and details in January, 2009! :-)
9. Cross Stitch – Yes it’s a sheep!
I started this little piece which is a monthly kit from my LNS and on an earlier post I asked everyone to guess what it was. Kathryn was the first one to guess that it was a sheep! It’s a free chart from Bent Creek “The Little Sheep that Could”. LOL!
Status: I finished the sheep and I’m stitching the swirls on the background.

11. Random Project
“Uncle Sam” by Janet Zickler Casey
I’m a member of the Shining Needle Society and Gay Ann Rogers in her classroom challenged everyone to stitch at least one hour on a project on July 4, 2008. I wanted to stitch on something with a July 4 theme so I pulled out “Uncle Sam”. I took this class from Janet at the 2001 ANG Seminar in Washington, DC. Unfortunately, “Uncle Sam” and my other class piece “North Star Santa” were put away as after I came home, I became sick. :-(
The first picture is how we looked when I pulled him back out again. The second picture is what I was able to complete this past week. He’s going to be put away again, but not for long! :-)
Status: Face completed.
Progress after class completed.
Progress this week.
I hope you had a wonderful weekend and you were able to stitch a lot! Thanks for visiting my
blog!!! :-)
Cynthia
Windy Meadow
Cynthia
Windy Meadow
Friday, July 11, 2008
“Rotation Stitching” -- July 11, 2008
Rotation Stitching is a hot topic on many blogs these days and since I’ve received some general questions about rotation stitching I thought I would spend a moment or two and write a quick explanation. :-)
Rotation Stitching is a technique used by many stitchers to “rotate” among different needlework projects. The needle worker stitches on one project for a set time period or until they complete a specific section. They then put this project away and start on the next project in the rotation. This continues until the needle worker finishes stitching on the last project in the rotation when they then start over again at the beginning with the first project.
If a project is completed during its turn in the rotation, it’s moved out of the rotation and another project is added to the rotation in its place. There must be at least two projects in a rotation, but there is no limit except for personal preference, on how many projects are in the rotation.
There are many benefits of rotation stitching including but not limited to;
1. Minimizes potential for boredom
Which may occur if you are stitching on only one project.
2. Minimizes “Stitch Me, No Stitch Me”, call from other projects.
You can tell those other projects that they have to wait their turn and you’ll get to them soon!
3. Progress can be made on several projects as opposed to just one.
At the end of the rotation you can “see” all of your wonderful progress.
Rotation stitching is a wonderful tool which can help with some of the anxiety that you may be feeling about soooo many projects in your stash.
How do you decide on a rotation strategy? There are as many different rotation stitching strategies as there are different stitchers! I do have some helpful hints that I’ve learned while setting up and evolving my stitching rotation. :-)
Before you start a stitching rotation you need to figure out what projects are in your stash that still need to be stitched. These can be projects that just need a few hours of work or projects that are brand new. You also need to figure out what projects have already been stitched that might just need to be finished into something as you don’t want to add a project that you have completed stitching to your rotation.
The first recommendation I would make is to list what you have accomplished. Lay those projects out on a table or on your bed and go "Wahoo! Look at what I've finished stitching!" :-)
Now make a pot of coffee, a cup of tea, or a nice iced cold beverage and then lay out all of the projects that you want to stitch and go "Wahoo! Look at all of the fun I'm going to have!" :-)
I've found that this helps me when my mind starts whirring about all of the stuff that I have to stitch and how in the world am I going to get it all done! If I list or mentally review my accomplishments/finished projects, I can then, with more positive thoughts, focus on what I need to do. Also by listing what I need to stitch, this helps the mind focus on the specific items as opposed to worrying about everything! :-)
Sometimes this process involves making lists and crossing the items off, or lining up my projects up and going "Cynthia you are GOOD!" LOL
The first decision with rotation stitching is "What are my categories for rotation?"So gather up your projects and separate them into categories. I have several suggestions of categories that you might want to start with;
- Gift Stitching or Projects that will be Presents
- Almost Done Projects
- Small Sized Projects
- Medium Sized Projects
- Large Sized Projects
- Planning Next Project/Organizing Projects (choosing fibers and stitches).
- Organizing Stash
- Community/Charity Stitching
- Canvases from a specific Designer/Canvasses from a Series
- Any other Categories?
Once you've selected your categories you can then decide on the order in which you want to rotate through these categories. Don’t spend too much time on this step as you will be eventually rotating through all of the categories.
You might also want to consider if you should spend twice as much time on any of the categories or add that category twice into the rotation. For example, let’s say that you have a lot of ornaments that you want to stitch for presents this year. This falls into the category of “Gift Stitching”. You can decide to have two “Gift Stitching” categories if you want to be working on two different ornaments at the same time or you can decide that you want to spend twice as long on this category as the other categories.
The second decision with rotation stitching is, "How are you going to rotate between your projects?" In other words, would you rotate projects?
- after a set amount of time on each project?
- after a set amount done on each project?
For example, rotate after you have completed one area on the project such as a face or a square of the design before moving on to the next category.
- when the next category calls to you?
- when you are tired of this project?
There is no right way to rotate among projects. After reading many different needlework blogs, I have seen examples of many different styles of rotation. One needleworker stitches one needle full of thread for a project and then moves on to the next project. Several work until they complete a section. Many set different time limits from ½ hour, one evening, to one week per project. There is also no right way to select categories for the rotation.
What I have noticed after reading many different blogs is that most needleworkers who rotate their stitching like to have a variety in their rotation such as several smaller, medium, and larger projects to help maintain interest in the projects and in stitching. The needleworker can then have several smaller finishes while they are working on that very large piece.
Now look at your progress so far. You have decided your rotation strategy and you have grouped your projects into different categories. Now comes the fun part! :-)
Begin separating your projects into your categories. Don't worry if one of the piles is a lot bigger than the other! Have fun thinking about all of the fun stitching time that you are going to have. Yes, I know this can be difficult and we all get overwhelmed at what we have in our stashes, but you'll be surprised at how quickly you will be able to finish up some of these projects! :-)
As you do this, remove any projects that you have decided that you will never finish stitching. These can be set aside to be donated or to be sold. Removing these projects from your stash will help you concentrate on what you want to complete and will help reduce your stash. You will also have a better knowledge of what projects are in your stash which will help you decide if you want to purchase additional canvases. This may actually help with limiting the amount of new projects that you buy if you know that you have so many wonderful projects already in your stash. Okay, this doesn’t usually help me but it’s a thought! LOL
Now that you have your projects separated into categories, you are now going to prioritize your projects. Pick out the three that you want to complete first in each category. For the medium and large sized projects you might want to pick the top two projects that you want to complete first. These should be stored close to yourstitching area so as you complete a project the next one is right there and ready to be worked. Notice that I said “projects that you want to complete first”. The goal of a stitching rotation is to finish a project before replacing it with a new project. It is not to keep adding projects to your stitching list. :-)
Now that you've selected your current stitching projects, keeping the other projects in their categories, place them in more "long term" storage. Make sure that you do store them by category as you don't want to have to go through the sorting process every time you add a new project to your rotation as you want to spend your time stitching, not organizing! You will also be able to place newly purchased projects in their respective category so that they can be added to the rotation when appropriate. Labeled plastic containers will help with this part of the process. Don't worry about the projects that you are putting away as you will be getting to them later when it’s their turn in the rotation. They are just being put away temporarily. :-)
Pick your first project for each category and place these in or near your stitching area. You are now ready to begin your rotation! :-)
Have fun and remember that your rotation system is just a tool. If you find that your current rotation process is not working for you, then feel free to modify your rotation. For example, I've modified my rotation system and added two new categories. One is for "Cross Stitch" projects and the other is "Random Projects". I have a lot of cross stitch projects so I wanted to add a category for this type of projects. The random project category is for those times when every once in a while I like to mix things up by stitching on something outside of my normal rotation. There may not be a set project in this category as this category may include several different projects. To prevent these projects from being added to my rotation list and expanding my categories, I work through my rotation at least twice before I stitch on one of my random projects.
One additional tool that I've added is a simple chart where I've listed on the left side of the chart my different categories in a simple table. Because of my busy schedule (working full time, wife, and mother of two teenagers) I've found that I can't cycle through my categories one after the other. There are times when I'm just too tired to work on a complicated project that night even if it is time for it in my rotation. As I work on each category, I make a check mark for that category. This helps me to see where I'm spending a lot of time and where I might need to spend more time. Since I teach needlework to children and teens, there are times when I need to spend a lot of time prepping materials for those activities. I can then see that I've been spending time on these categories (several check marks) and it's time to move back to stitching for me. :-)
Please note that I've added a category for planning your next project or organizing projects. As you work down through the projects, you will need to select new projects to add to the rotation. You are going to find projects that may need more or new fibers (especially since we have soooo many new fibers now), or you may want to rethink about how you are going to stitch that project. As we develop as stitchers and as we become comfortable with new stitches and fibers, we may not want to use the stitches or fibers that we previously planned for a project.
Also, if you enjoy writing your own stitch guides, allocate time for planning the next project. If you don't enjoy writing your own stitch guides, and you decide you need help with a project, please consider sending the canvas(s) to a needlepoint shop. Many needlework shops will help design a stitch guide for free for a canvas if that canvas was purchased at that shop. There are also needlework shops who for a fee, will design a stitch guide and pull fibers for a canvas or set of canvases even if they were not purchased through that shop. If you have a set of canvases in a series such as a circus scene or a set of flowers in the same style, I would consider sending them all to the same shop so that as they write the stitch guides, they will also reuse fibers for the different canvases which would help with the cost of the project. The canvases in the series or set will also have the same look and feel. You might also want to contact different shops as there may be shops who have already written stitch guides for that particular line of canvases. Even though you didn't purchase the canvases through them, they may be willing to sell you their stitch guides and the fibers that they used.
There are many different needleworkers who have blogged about their rotation systems and many have labeled these posts. Start with your favorite blogs and search to see if they have labeled any posts with organizing, or rotation stitching. If you don't have any favorite blogs that you read regularly, you might want to start with my blog. I have several entries about my rotation system. In addition, I have links to many other blogs where the needleworkers "talk" about their rotation system.
You might also want to consider creating a needlework blog. Since I enjoy reading other needlework blogs, I decided to create one of my own. I’ve found that my blog has actually helped me to focus on my rotation stitching as I need to have pictures of projects for my blog! You can imagine this conversation with my family, “Not right now as I need to stitch so that I have something to post this weekend!” Well it doesn’t always work, but I try!!! LOL
Have fun!
Cynthia
Windy Meadow
Wednesday, July 9, 2008
“Stitching Update” -- July 9, 2008
Over the last several weeks I’ve been mainly working on my gift stitching and my Bargello Challenge. I’ve already shared pictures of my Bargello Challenge with you last week. Since family members read my blog, I’ll share pictures of my gift stitching in January, 2009 after the projects are given as gifts.
In the meanwhile, what else have I been up to?
I’ll have more details after this weekend as I have several projects that I want to get just a little bit more done before I share a picture. In the meanwhile, I thought I would share a wee picture of a cross stitch picture that I started.
Can anyone guess what it is? Kathryn and Ruth, this one is for you! :-)

Cynthia
Windy Meadow
Saturday, July 5, 2008
2008 Stitching Goals Update -- July 5, 2008
I posted a list of 2008 stitching goals last January and since June has just ended I thought I would see how I was doing. You can read detailed descriptions of each of the original projects in my rotation on my January 3, 2008 post at;
http://cyns-stitches.blogspot.com/2008/05/2008-stitching-goals-january-3-2008.html
One of the first things I did was shortly after starting my rotation I decided to redo my categories of projects. Instead of rotating between specific projects I created categories of types of projects. I found that I had too many large projects and my original rotation system wasn’t working.
1. Large Project: “Holiday Patches” by Susan Krendt
Status: 13 of 24 squares completed.
3 squares are almost completed.
This is a wonderful piece that I started as a class at the ANG Baltimore Seminar in August,
2007. You can still the piece on ANG’s website at;
http://www.needlepoint.org/Seminar-07/classes/4day/42711.php
2. Medium Project #2: “Candy Swirl Santa” by Janet Zickler Casey
Status: Face is done and working on hat.
http://www.jzcdesigns.com/candy%20swirl%20santa.htm
ANG Auction Project A Collection of Design’s “Pumpkin Boy”
Status: Completed!
Medium Project: “North Star Santa” by Janet Zickler Casey
Status: Completed!
http://www.jzcdesigns.com/north%20star%20santa.htm
3. Small Project: April, 2008 Canvas of the Month Club
“Peppermint Stripes” stocking by Joan Lohr
Status: Started body of Stocking.
Canvas of the Month Club – July 2004
“Santa” by Cheryl Schaeffer for Rainbow Gallery
Status: I stopped working on this project as I misread the directions and used the wrong fiber
for the wrong section. I ordered more fiber but had to wait till it arrived. I’ll put this
back in the rotation to finish this project this summer.
Canvas of the Month Club – January, 2008
“Medallions” by Joan Lohr for Rainbow Gallery
Status: Completed!
Canvas of the Month Club – October, 2004
“Hearts for the Holidays” by Joan Lohr for Rainbow Gallery
Status: Completed!
Canvas of the Month Club – February, 2008
“Christmas Fantasy” by David McCaskill for Rainbow Gallery
Status: Completed!
Canvas of the Month Club – August, 2004
“O’ Tannenbaum” by Beth Robertson and Suzanne Howren of Shear Creations for Rainbow
Gallery.
Status: Completed!
Canvas of the Month Club – March, 2008
“Tiny Treasures” was designed by Cathy Lyon and Marian Morton for Rainbow Gallery
Status: Completed!
4. Community Stitching (Charity)/Teaching Needlework
This category is for community (charity) stitching. I’ve also added into this category the time
I spend on preparing and teaching needlework to children and teens. This also includes the
time that I spend organizing needlework kits that are used to teach needlework at different
events.
Status: Replenished Needlepoint Magnets & Cross Stitch kits.
Need to restock supplies for above kits.
Need to prepare for August camp-in event.
5. Organizing Needlework Stash
Status: Lot’s of progress.
Three boxes have been shipped to be sold on eBay.
Lot’s of canvases have been sorted and inventoried.
Lot’s of fibers have been sorted and inventoried.
Lot’s more to do!
6. Household Stitching
This is misc. stitching such as repairing household items and sewing on scouting patches. The
biggest challenge for me is to keep up with the scouting patches, especially since they receive
a bunch that they’ve earned in the previous months all at one time! :-)
Status: Kept up with those received since January, 2008.
Need to sew on the ones that they received at the end of the year or at the last Court
of Awards/Honor.
7. Beaded Project: “Moonlight Ghost” (2008) MH188205
Status: Have stitched three colors. About 1/3 - ½ done.
8. Gift Stitching
These are needlework gifts for family members. The challenge is to find time to stitch on
them when the respective family member is not at home. I recently reorganized how I store
these projects so it’s much easier to pull them out and work on them. I’m taking pictures as I
work and I’ll share them with everyone in January, 2009.
Daughter’s Christmas Ornament
Status: I’ve made some progress on this project but progress is slow as I can’t stitch while
she’s home. She will be going away soon for several weeks so I expect to make a lot
of progress while she’s gone.
Husband’s Christmas Ornament
Status: I’ve made some progress on this project but progress has been slow. I can stitch on
this while he’s home but I just haven’t had time and I need to concentrate on dear
daughter’s as she will come by to see what I’m working on. I can stitch in front of my
husband him and he wouldn’t probably notice what I’m working on where my
daughter will notice. LOL
Son’s Christmas Ornament
Status: I’ve made some progress on this project but progress has been slow.
Dear son will be going to camp and I’ll concentrate on his ornament while he’s gone.
9. Cross Stitch
I decided to add a cross stitch project to my rotation as I enjoy doing cross stitch and I have
lot’s and I do mean lot’s of projects in my stash!
Status: Current project is half done. Picture to be shared on next bi-weekly update.
10. Travel Piece
Barbara Fox’s “Noel Star”
Status: A little bit of progress since January, 2008.
I’m doing the background in basket weave so this is my “I’m too tired to think or traveling
piece”. I haven’t been traveling so this piece hasn’t been worked on much since
January, 2008.
11. Random Project
I decided to add this category as just sometimes I need to shake things up a bit! The pieces
in this category will be worked on for brief periods until they go back to wait their turn for
the above categories!
12. Almost Done Works in Progress
As I’m organizing my stash, I’m finding lot’s of projects that for one reason or another I set
aside when they were almost completed or at least they are 90% done. I’m going to add
another category to my rotation so that I can start completing these projects. The projects
that are placed in this category will only take one to two hours to complete. Or at least that’s
what I’ll estimate that they’ll need! :-)
“A Collection of Designs” Firecracker Cookie
Status: I set this project aside as I didn’t like the fiber that I selected for the medium blue.
I’ve picked out new possibilities for the medium blue. Once I solve this problem, I expect
that this project will work up in about one to two hours.
Unfinished Objects (UFO’s) or Projects in Waiting (PIW’s)
Listed below are the projects that I wanted to complete when I created my original list in January, 2008. They’ll be added to the categories listed above when a previous project has been completed.
1. My Son’s Strictly Christmas Stocking
Status: No progress since January, 2008.
2. “Heartstrings Chimney Santa”
Status: No progress since January, 2008.
3. “Cobblefield Road” Cyber Workshop
Status: No progress since January, 2008.
I’m very pleased with the progress that I’ve made in the first six months of 2008. I’m especially with how I am organizing my needlework projects, rotation, and supplies. This has helped to clean up the stitching area and has made it a lot easier to pick up a project when I have time. I’ve also enjoyed finding many projects that quite frankly, I forgot that I had. I’ve finished the stitching on many of these projects but I’ve also found a lot of projects that I set aside for one reason or another that won’t take too much time to finish.
My completion status is:
Medium Projects: 2
Small Projects: 5
I’m quite pleased with the projects that I’ve completed so far this year and I’m looking forward to completing many more projects in the second half of 2008!
I hope you enjoyed reading about my progress and my rotation. Thank you for visiting my blog and I enjoy reading your comments!
Cynthia
Windy Meadow
Tuesday, July 1, 2008
“Bargello Challenge #2” -- July 1, 2008
Janet designed the Bargello line for the challenge and after I received a copy of the line I had a lot of fun designing my stocking!
The first think I did was design a stocking shape. I usually do this by laying DMC #5 on the canvas. I then manipulate the thread till I get the shape that I want. I then stitch the outline of the shape. I’ve pasted a picture below of the outline of my stocking. I wasn’t thinking about taking pictures when I did this so the outline is in white but I think you can still see it in the picture.
Windy Meadow
The first think I did was design a stocking shape. I usually do this by laying DMC #5 on the canvas. I then manipulate the thread till I get the shape that I want. I then stitch the outline of the shape. I’ve pasted a picture below of the outline of my stocking. I wasn’t thinking about taking pictures when I did this so the outline is in white but I think you can still see it in the picture.

I then stitched a border between the body of my stocking and the cuff of the stocking. I first stitched a Smryna Cross using Kreinik silver braid followed by two tent stitches one on top of the other using a Kreinik pearl braid.
Since I’m currently working on several Holiday pieces that are in red and green, I decided that I wanted to give my stocking a slightly different look. While visiting my LNS I decided to use Silk and Ivory in blue, cream and yellow as it fills in wonderfully with Bargello stitches on 18 count canvas. I also added a silver Kreinik ribbon to add some texture and visual interest. I selected an ecru canvas as I think it helps when stitching Bargello projects to pick a canvas color that disappears behind the colors of the thread. After completing the body of the stocking, I then stitched the cuff using the first four stitches of the Bargello line in Rainbow Gallery’s white Fuzzy Stuff using two strands.
Once I finished the stocking I added two rows of tent stitch around the stitched stocking in the same color of the canvas which in this case is ecru. This gives the finisher something to stitch on when they are finishing the project and helps keep the Bargello stitches from being pulled during the finishing. Of course, always check with your finisher to see what they would prefer! :-)
I think it’s very interesting that both Janet and I stitched a stocking using the same Bargello line and they turned out so different. We both selected blue for our projects, though we didn’t discuss our color selections before we stitched our stockings. Even though both stockings are stitched using blue threads, they both look so different and both turned out beautifully!
If you decide to use Janet’s line to create your own Bargello project such as another stocking, a star, or any other shape, please let Janet and I know where we can see your project. You can reach Janet at; napaneedlepoint@gmail.com
I had a lot of fun designing and stitching my stocking and I wanted to thank Janet for visiting my blog on her blog tour!
Windy Meadow
"Bargello Challenge #1" -- July 1, 2008
Janet Perry has just published a new book, “Bargello Revisited”. She began a Bargello blog tour several weeks ago and has visited many different blogs which you can read about on her blog; http://www.nuts-about-needlepoint.com/.
As part of her blog tour she asked if anyone would be willing to participate in a Bargello Challenge and I volunteered! I’m going to turn my blog over to Janet so she can talk about her project for the Bargello Challenge and then I’ll talk about mine. Enjoy!
Here’s Janet!!!
---------------------------------------------------------------------------------
Cyn and I did a Bargello Challenge this month. Because Bargello lines can be varied easily and because there aren't any set colors, a challenge is a fun way to do Bargello as a group.
The principle is very simple. Find (or make) a simple Bargello line. Give it to everyone who is participating in the challenge.
http://www.napaneedlepoint.com/
http://www.nuts-about-needlepoint.com/ - blog
---------------------------------------------------------------------------------
Thanks for visiting my blog Janet!
Cynthia
Windy Meadow
As part of her blog tour she asked if anyone would be willing to participate in a Bargello Challenge and I volunteered! I’m going to turn my blog over to Janet so she can talk about her project for the Bargello Challenge and then I’ll talk about mine. Enjoy!
Here’s Janet!!!
---------------------------------------------------------------------------------
Cyn and I did a Bargello Challenge this month. Because Bargello lines can be varied easily and because there aren't any set colors, a challenge is a fun way to do Bargello as a group.
The principle is very simple. Find (or make) a simple Bargello line. Give it to everyone who is participating in the challenge.
 Each person chooses colors and, if wanted, varies the line. Then the fun begins. Each Bargello is stitched. While Cyn and I both did mini-socks, you don't have to all have the same shape.
I decided to make outlined shapes (the solid blue violet) by offsetting the lines. I had thought about doing something like this for quite awhile and I'm glad I did. While the picture doesn't show it and the metallic obscures it, the stitches aren't all the same length in the center. I'm thinking that I need to explore this idea more to see what characteristics the line needs to have to make pretty fills.
But back to the mini-sock itself. I found this charming color of Gloriana's Lorikeet. Lorikeet is one of my favorite threads for Bargello because it is a fine wool, Four strands fill up of 18 mesh canvas beautifully and the colors are so lush. This one is called Monet's Garden. To this I added the blue-violet (Silk & Ivory - another favorite) and Crescent Colours floss in a very subtle hand-dyed watery blue). The final touch was a metallic ribbon from Kreinik.
I really like the soft shading of the non-metallics against the more forward metallic. Because the metallic is not a solid color, it is less harsh and, I think, more interesting.
I loved doing the challenge and am looking forward to doing one again.
If you want some additional ideas about variations in Bargello, find the book Bargello Magic. There is a section in that where the same pattern is colored in many different ways. You need to get past the garish 70's colors and see the different and wonderful patterns which emerge from one basic diamond pattern.
Keep Stitching,
Janet M. Perry
http://www.napaneedlepoint.com/
http://www.nuts-about-needlepoint.com/ - blog
---------------------------------------------------------------------------------
Thanks for visiting my blog Janet!
Cynthia
Windy Meadow
Subscribe to:
Posts (Atom)

