I’ve finally had a chance to take some pictures so I can share some progress on my stitching projects. Enjoy!
2. Medium Project: “Candy Swirl Santa” by Janet Zickler Casey
Status: I’ve made some progress on the hat. The first swirl is done and I have the second swirl about ½ done.

3. Small Project:
“Peppermint Stripes” stocking by Joan Lohr April, 2008 Canvas of the Month Club
Status: I’m still working on the body of the stocking. The silver and red vertical stripes work up very quickly. The green stripe is the Fern stitch which takes a little longer as I have to carefully lay all of the threads. It’s worth the time and effort as it’s very pretty when it’s done.

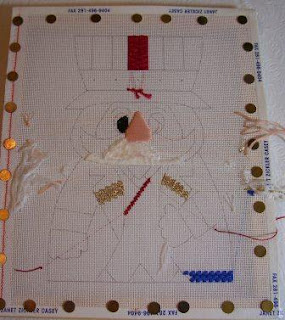
“Santa” by Cheryl Schaeffer
I started working on this project last Spring but I had to stop as I mixed up two of the threads and had to order both threads. The Alabaster has come in so I was able to finish the mustache and beard. I’m still waiting on the Fancy Fur to finish the pompom on the top of his hat. Since the border is raised, while I’m waiting on the Fancy Fur, I’m stitching about three rows on basket weave so that finisher has a smoother flatter edge for finishing.
Status: Finished mustache and beard.
Started stitching basket weave edge.

8. Gift Stitching
Status: In the last two + weeks I was able to work on DD’s and DH’s ornaments. Pictures and details in January, 2009! :-)
9. Cross Stitch – Yes it’s a sheep!
I started this little piece which is a monthly kit from my LNS and on an earlier post I asked everyone to guess what it was. Kathryn was the first one to guess that it was a sheep! It’s a free chart from Bent Creek “The Little Sheep that Could”. LOL!
Status: I finished the sheep and I’m stitching the swirls on the background.

11. Random Project
“Uncle Sam” by Janet Zickler Casey
I’m a member of the Shining Needle Society and Gay Ann Rogers in her classroom challenged everyone to stitch at least one hour on a project on July 4, 2008. I wanted to stitch on something with a July 4 theme so I pulled out “Uncle Sam”. I took this class from Janet at the 2001 ANG Seminar in Washington, DC. Unfortunately, “Uncle Sam” and my other class piece “North Star Santa” were put away as after I came home, I became sick. :-(
The first picture is how we looked when I pulled him back out again. The second picture is what I was able to complete this past week. He’s going to be put away again, but not for long! :-)
Status: Face completed.
Progress after class completed.

Progress this week.
I hope you had a wonderful weekend and you were able to stitch a lot! Thanks for visiting my
blog!!! :-)
Cynthia
Windy Meadow


 Each person chooses colors and, if wanted, varies the line. Then the fun begins. Each Bargello is stitched. While Cyn and I both did mini-socks, you don't have to all have the same shape.

